Sunday, August 11, 2019

iOS 13: How to Disable Bluetooth and Location Access for Apps on iPhone


Every year, Apple gives users better control over their security and privacy. In iOS 13 and iPadOS 13, Apple has introduced two new features giving users precise control over when they share location data with apps, and which app has access to Bluetooth. Here’s everything you need to know about how to disable Bluetooth and Location access for apps in iOS 13 and iPadOS 13.

Some apps have been using Bluetooth and Wi-Fi information in the background to figure out your location. To combat this, Apple is scrambling Wi-Fi and Mac ID data, and giving the users the control over which app needs Bluetooth access. You should know that this has nothing to do with the media playback using Bluetooth devices. That will work normally, as it goes via the system Bluetooth and AirPlay feature.

Apps use Bluetooth for many legit reasons as well. For example, Bluetooth is used to set up devices like Google Home and it’s used to find Google Chromecast in all Google apps. This means that many apps that you open the first time after installing iOS 13 will throw the new Bluetooth access dialog. You’ll be left scratching the head as to why exactly does this app need access to Bluetooth.


How to Disable Bluetooth Access For Apps on iPhone

As this is a privacy issue, it’s best to disable Bluetooth access for all apps, unless something in the app stops working. Then, you can go to Settings and enable/disable Bluetooth access for an app at any given time. Here’s how it works:

Step 1: Open the Settings app and go to the Privacy section.

Step 2: Here, select the Bluetooth option.


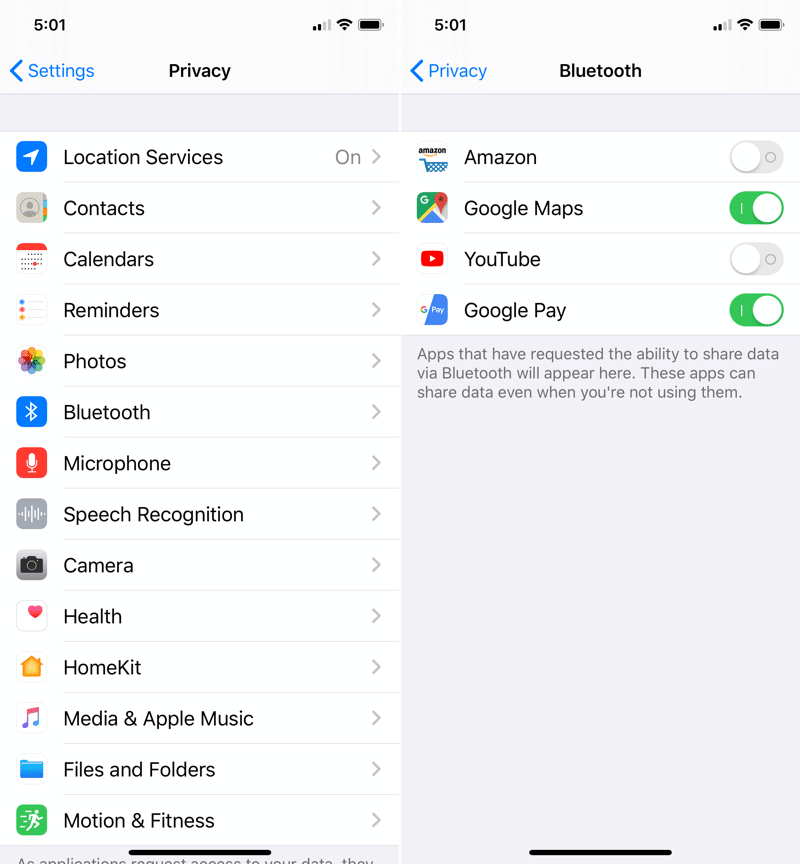
Step 3: Now go through this list and tap on the toggle next to the app’s name to disable/enable Bluetooth access.
How to Control Location Access For Apps on iPhone

iOS 13 changes the Location Services feature in a big way. Apple will no longer grant constant background location access to an app immediately. In the new popup for Location Services, there is no “Always Allow” option.


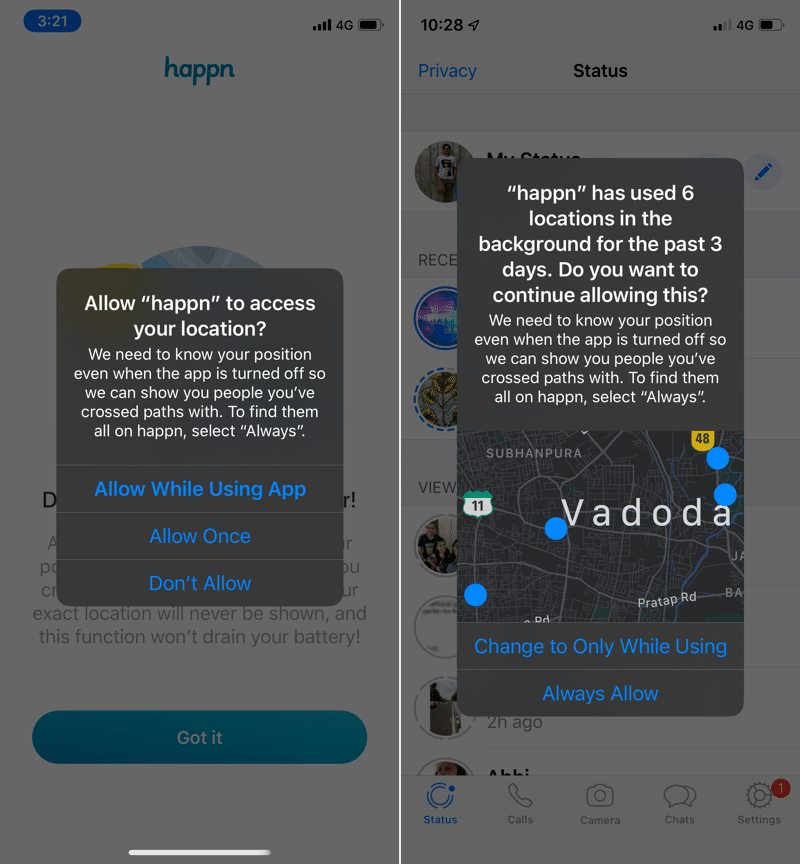
Instead, you’ll see these options: Allow While Using App, Allow Once, and Don’t Allow. Once you use the Allow While Using App, and after the app has requested your location multiple times in the background, you’ll see a new popup, telling you so. And from here, if you choose, you can tap on the Always Allow button to give the app constant background location access.

As you might have noticed, the Allow Once option is new. It will give the app location access only until you quit the app. This is great when you’re using less-than-trustworthy apps like Uber.

You can also change the Location access at any time from Settings.

Step 1: Open the Settings app and go to the Privacy section.

Step 2: Tap on Location Services.

Step 3: From this list, select the app in question.


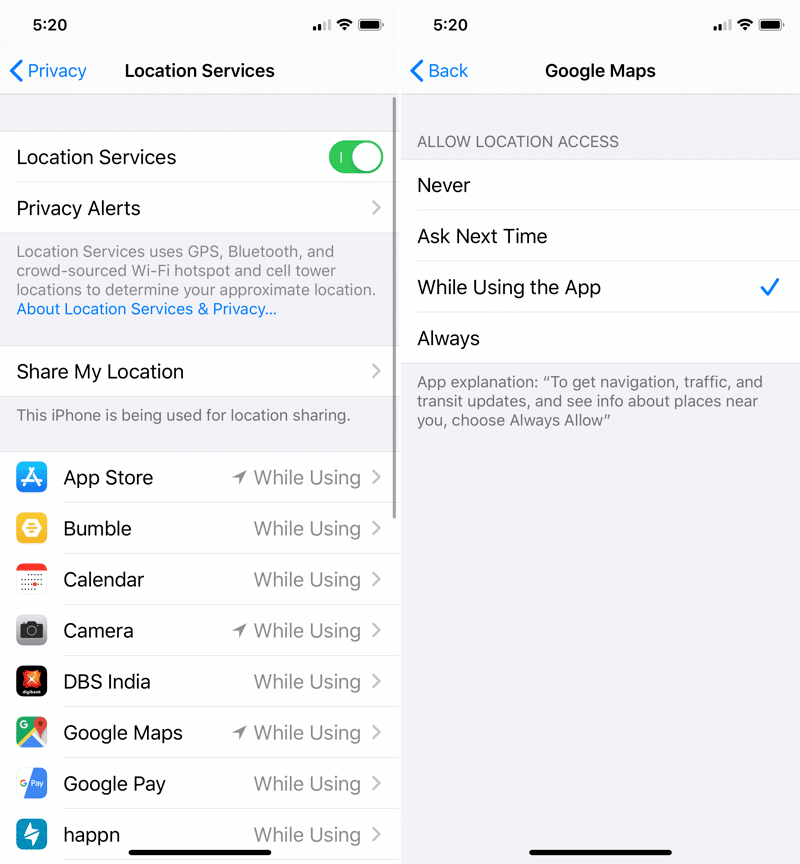
Step 4: You’ll see a couple of options here: You can choose Never, Ask Next Time, While Using the App, and if available, Always.
Your Thoughts?

What are your thoughts on the new privacy features in iOS 13? Do you think this will help you game more peace of mind? Share your opinions with us in the comments below.

We’re working on bringing you more detailed guides for how to use the new and awesome features in iOS 13. Once you’ve read our iOS 13 tips and tricks article, read our how-tos below.If you lost data after you updated to a new iPhone, you can always use Gihosoft iPhone Data Recovery to get the data back from the old iPhone or backup.You may also like: iphonerecovery.com


Tuesday, August 6, 2019

This Sleek Surge Protector Doubles As A Phone Stand [Deals Hub]


Do you find it hard to get all your gadgets charged up with just the traditional outlet by your desk or bedside table? In today’s world, we’ve all got a plethora of devices that need to be powered up. The NTONPOWER 3-Outlet & 3-USB Port Surge Protector + Phone Holder eliminates the struggle of which device gets priority. And it’s available now in the iPhone Hacks Deals Hub for just $19.99 — 20% off the usual MSRP of $24.99 — in either crisp white or sleek black.

The NTONPOWER gives you the ability to safely charge up six devices at once. Just take advantage of the three standard outlets, or utilize the three additional USB ports to make sure your gadgets are powered up. Unlike other surge protectors that are so bulky you want to hide them, the NTONPOWER is sleek and compact and offers you the added benefit of pulling double duty as a smartphone stand. Just plug your phone in and prop it up and you’ve got a handy source of hands-free entertainment!

Get the NTONPOWER 3-Outlet & 3-USB Port Surge Protector + Phone Holder in the iPhone Hacks Deals Hub today. It’s available in both white and black for just $19.99.Read Next:best slideshow app for android

Read Next:anilinkz


Sunday, August 4, 2019

Backup an Individual Chat or Group via Email


Backup an Individual Chat or Group via Email

You can also choose to backup an individual chat or group using the export feature. This process will back up your chats via email. When you need them again, you can simply download them from your email. Here’s how you can export an individual chat or group;

Step 1: Open WhatsApp on your phone, go to Settings > Chats > Chat History > Email Chat.

Step 2: Choose the chat or group you want to export, and then choose if you want to include Media or not.

Step 3: An email will be generated and sent to the email address you provide with the chats attached to it as a .txt document.


If you lost data after you updated to a new iPhone, you can always use Gihosoft iPhone Data Recovery to get the data back from the old iPhone or backup.You may also like: iphonerecovery.com

Conclusion

The above are three different alternatives to a Google Drive Backup. You can use one of them whenever Google Drive doesn’t work or you don’t want to use Google Drive. Although it is a paid program iTransor provides users more options when backing up and restoring WhatsApp backup than any other Google Drive alternative.

Thursday, August 1, 2019

iOS 13: How to Check For App Updates on iPhone


There are a couple of new services coming to iOS 13. Along with Apple’s News+ subscription and TV+ service, Apple is releasing a new Arcade subscription. It’s Apple’s gaming-related service. While it might be great (we don’t really know yet), it has already managed to anger a subset of Apple users. The Arcade tab is where the old Updates section used to be. Here’s how to find the new updates section in iSO 13.
Find the Updates Section of App Store on iPhone in iOS 13

When you open the App Store on your iPhone or iPad after upgrading to iOS 13, you’ll find that the Updates tab is gone. It’s replaced by a gaming icon that says Arcade.

In the current iOS 13 beta, the Arcade feature is not live. It just shows a splash screen. The Updates section is still there it’s just in a new place.


Step 1: To go to the Updates section of the App Store in iOS 13, go to the Today tab or the Search tab and tap on your Profile icon in the top-right corner.

Step 2: Your Account screen will open in a new panel. If you have any updates available, you’ll see them at the bottom of the screen. If you have automatic updates turned on, as I do, you’ll see a section called Updated Recently which will show a list of recently updated apps.


Everything else is the same. You can expand the update notes, you can update apps individually and open updated apps.

In fact, there’s even a new feature. You can swipe left on any app on the Updates or Recently Updated list to reveal a Delete icon. Tapping on it will actually delete the app from your iPhone or iPad, and not just from this list.

This is a great new feature especially if you install a lot of apps and then forget to use or delete them. As and when the updates come in, they can serve as a good reminder to ask yourself, am I actually using this app? If the answer is no, well, just swipe left, tap on the Delete button and move on.
Learn More about iOS 13 and iPadOS 13

This is just one small change in iOS 13. There a lot more like this. We’ve compiled the top 25 changes in iOS 13 that you should know about.

If you’ve got the time (and the curiosity), take a look at our mega iOS 13 new features list (100+) to find out every big and small feature in the upcoming iPhone and iPad update.If you lost data after you updated to a new iPhone, you can always use Gihosoft iPhone Data Recovery to get the data back from the old iPhone or backup.You may also like: iphonerecovery.com


What do you think of the new place for the updates section? Are you mildly annoyed by it or you don’t really care? If you have automatic app updated turned on (and they are turned on by default) you rarely go to the Updates tab anyway. Share your thoughts with us in the comments below.

How to Enable Spatial Sound in Windows 11

  How to Enable Spatial Sound in Windows 11 Here's how to enable  Spatial Sound  in Windows 11: Open Settings by pressing Windows key + ...