Sunday, March 31, 2019

Unlock Android Phone Without Password


Method 1. Unlock Password On Samsung Phones Through 'Find My Mobile' Service

The people who have Samsung mobile phones will be glad to know this that Samsung phones have an additional feature of "Find My Mobile" to help them access their device in such conditions. This way, you can learn how to unlock a locked Samsung Galaxy easily and quickly.

The steps you need to follow are given below:

Step 1 The first thing you need to do is to open the Samsung Find My Mobile website and log in with your Samsung account.


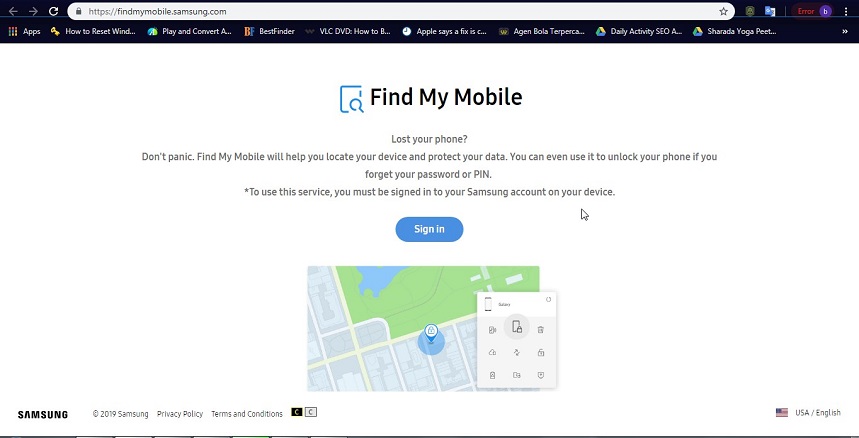
Step 2 Once you are logged in to your account, you will be directed to the home screen interface. On the home screen, you will see various options. Among them, choose the "Lock My Screen" option.

Step 3On the right side, you will be asked to create a new pin to lock the device. Enter an easy pin and tap on the lock button.


This will lock your device and override the previous lock screen password/pin. Thus, you can also unlock your device without using Google Account.

Pros:


The feature can help every Samsung user to recover their device password easily.


The feature and various other services added to the list.

Cons:


The method only works for Samsung devices.


You need an already existing Samsung account on your phone.
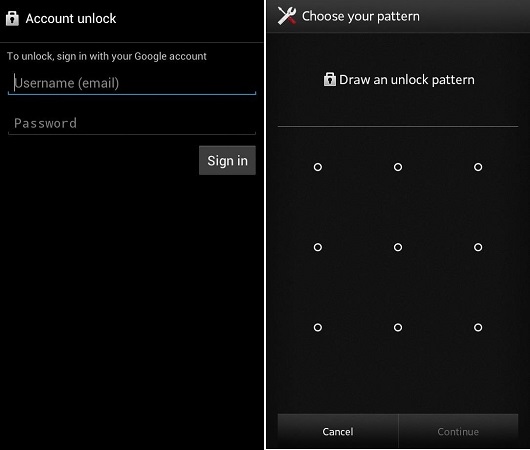
Method 2. Use the 'Forgot Pattern' Feature (Android 4.4 or Lower Only)

This used to be the most common method to unlock the device before the fast upgrade of Android versions. After a few failed attempts of entering the wrong password, the screen used to display a message stating the Forgot pattern.

And this is how to unlock the android phone with the "Forgot Pattern" method:

Step 1 After you've made a few unsuccessful attempts of entering the wrong password, you will see the Forgot pattern option on the screen.


Then you will be prompted to choose the method which you want to use to unlock the device. Select the Enter Google account details option and click on the Next button.

Step 2 Enter your primary account details and you will be navigated to a screen where you can add a new pattern. Confirm the pattern and your device unlock pattern will be changed.


Pros:


The feature is like a default method in-built in various Android devices.

Cons:


The device requires an internet connection to work.
Method 3. Delete the Password File Using ADB

This method can be used to understand how to delete Android password if you have enabled the USB debugging option in your phone. And you also need to connect your device to a computer via USB cable.

Once the connection is established, follow the step below:

Open Command Prompt in your computer and open the ADB installation directory. Type the command- adb shell rm /data/system/gesture.key in the space and run it by hitting the Enter key.


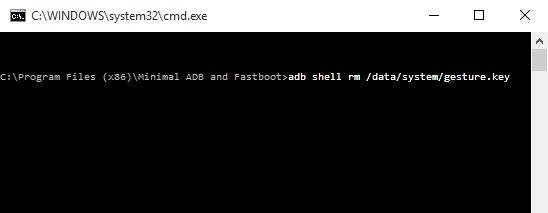
This will erase the password file from your device temporarily. So, you need to reset the password as soon as possible.
Method 4. Bypassing Third-party Lock Screen By Booting Into Safe Mode

Another method that you can try out to see how to unlock a locked phone is the use of Safe Boot method. This method is also quite simple but it only works when you've set a password from the third-party app instead of the inbuilt security system.

Step 1 Boot the device in Safe Mode using the power button and tap on Ok when the device prompts you to reboot to safe mode.


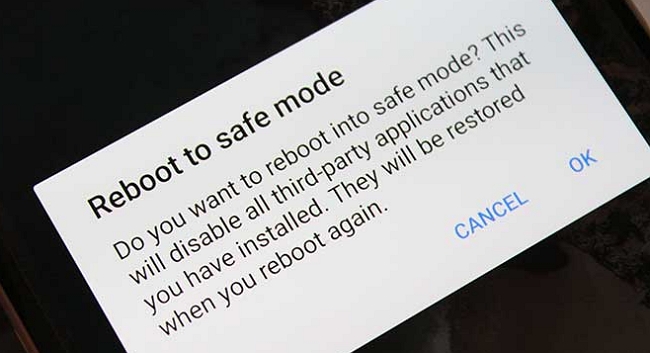
Step 2 This will disable the third-party lock screen for some time so that you can easily clear the app data or uninstall the app.
Method 5. Unlock Android 5.0-5.1 Password

The users can also try out this method to unlock their device. But remember that this method is quite complicated and time-consuming. In this method, you will need to crash the user interface so that the home screen can become accessible again.

Here are the steps that you need to learn to understand how to unlock a locked Android device without passcode:

Step 1 Tap on the Emergency button from the lock screen and press the Asterisk button 10 times from the dialer. Copy the string and paste it in the same space as many times as possible. Ultimately, the device will prevent you from pasting the string.

Step 2 Now, return to the lock screen and open the camera. When the camera opens up, open the notification panel and choose the Settings option.

Step 3 Once more you will be prompted to enter the password. Again paste the string in the space and keep on repeating the same step until screen crashes.


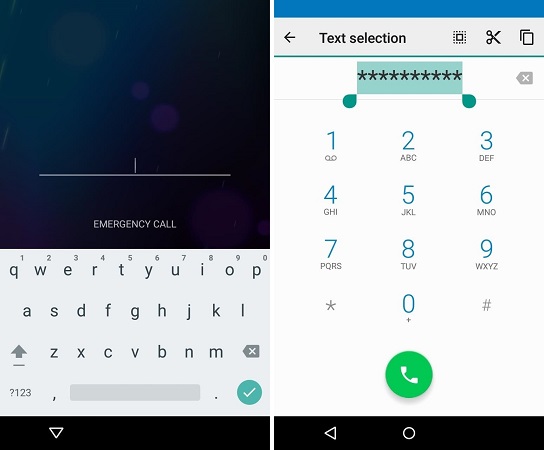
When the device gets the interface working, you will be navigated to the home screen automatically.
Method 6. Factory Reset

The factory reset method is also quite effective when it comes to unlocking the device. This method works under all conditions. So, you can use the factory reset and wipe out the entire data on your Android device. Putting the device in factory reset mode is quite different for different devices, so have to check the method according to your brand and model. Once you've activated the factory reset mode, follow the steps mentioned below to know how to unlock android phone without code:

Step 1 From the boot loader screen, use the volume up and down button to navigate and the power button to select an option.

Step 2 Choose the Recovery Mode option and select the "Wipe data/Factory Reset" option from the list.


This will wipe out all the existing data and settings from your device and you can freely access your phone once again.

Also Read:jihosoft Free iPhone Data Recovery

Sponsor ads:

Gihosoft Free iPhone Data Recovery:https://www.gihosoft.com/iphone-data-recovery-free.html

Gihosoft iPhone Data Recovery Free

Free iPhone Data Recovery Software for Windows/Mac

Recover up to 12+ types of files, including contacts, SMS, photos, WhatsApp, Viber, notes, etc.

Restore lost data from iOS devices directly or from iTunes and iCloud backup

Recover iPhone data lost due to iOS upgrade/jailbreak, accidental deletion, device lost or broken

Support all the latest iPhone, iPad and iPod Touch

Both Free and Pro version.

If you lost data after you updated to a new iPhone, you can always use Gihosoft iPhone Data Recovery to get the data back from the old iPhone or backup.You may also like: iphonerecovery.com

Also Read:Update Android

Also Read:Top 8 Best Alternative Websites to TamilGun in 2019

Also Read:Free Download FRP Bypass APK for Android 2019

Also Read:Best 10 Movie4k Alternative Websites for Movie Streaming 2019

Tuesday, March 26, 2019

How to Wirelessly Charge Your AirPods


Apple in March launched second-generation AirPods that include several new features over the original models, including the ability to wirelessly charge using third-party charging pads.


Apple also launched a Wireless Charging Case for use with first-generation AirPods, so if you bought a pair of new AirPods with Wireless Charging Case, or you purchased a Wireless Charging Case separately, then keep reading to learn how the charging procedure works.


How to Charge Your AirPods Wirelessly

New Apple AirPods usually come fully charged out of the box, but at some point during use you'll hear a tone when your AirPods' batteries are low, and another tone just before they run out.


When that time comes, it's time to charge your AirPods. Simply putting them back in the case usually does the trick – the case holds multiple, full charges for your AirPods, allowing you to charge on the go. But at some point the charging case will also become depleted, and then it will need charging too.


Apple's Wireless Charging Case and second-generation AirPods can be charged with any Qi-compatible charging mat or stand. (If you don't have one and are wondering which to buy, check out our roundup of the best Qi-compatible charging mats and stands for Apple devices.) Here's how it's done.


Place the case on the charger with the status light on the front of the case facing up (or towards you if you're using a stand). Note that you can charge your case with or without your AirPods inside.


The status light should turn on for several seconds, then turn off as it continues to charge.


If the light doesn't turn on when you put it on the charging mat, try repositioning the case.

If you have trouble getting the case to charge, check that the cable is firmly plugged into the charging mat and that the other end is correctly plugged into a power outlet. If the case still isn't charging, don't forget that you can also charge it by plugging the supplied Lightning cable into the Lightning connector on the bottom, and the other end of the cable into a USB charger or port.


Checking Your AirPods Battery Life

You can check the battery status of your AirPods by opening the charging case lid with the AirPods inside and holding the case close to your iPhone. The charge status of your AirPodsand their case should appear on the device's screen, and if you take out an AirPod, you'll see individual percentages for the two earpieces.


You can also check the charge status of your AirPods using the Batteries widget in your iPhone's Today View, accessed by swiping right on the Lock screen or on your Home screen's first screen of apps.


A fully charged Wireless Charging Case will provide AirPods with more than 24 hours of listening time, or up to 18 hours of talk time. If you charge AirPods for 15 minutes in the case, you get up to 3 hours of listening time or up to two hours of talk time. Also Read:Update Android


Also Read:Top 8 Best Alternative Websites to TamilGun in 2019

Friday, March 15, 2019

The best IPTV apps for your Android device 2019


IPTV, or Internet Protocol television, is the platform that allows you to watch television channels via an Internet connection. In order to do this, you'd usually need to register for certain online services or download software to your PC. But how can you enjoy your favorite channels on your smartphone? As usual, the solution to all this is apps!

In this useful guide we will show you, in our opinion, the best IPTV apps currently available on Google Play Store which you can install on your Android device, smartphone or tablet. Of course, we remind you that, in order to take advantage of these apps, your device must be connected to the Internet via Wi-Fi or mobile data (watch out for consumption).
GSE SMART IPTV

This completely free application (with optional in-app purchases) allows you to watch TV channels via streaming, using lists in M3U or JSON format, and which you can upload via HTTP or FTP links. The interface is very intuitive, allows you to check out the television guide (EPG) and contains an integrated video player full of useful commands for certain functions. There is also the possibility of transmitting content from your smartphone to your TV via Chromecast or Apple TV.

GSE SMART IPTV
IPTV Extreme

IPTV Extreme is one of the most downloaded and appreciated apps in this category. Free, simple and intuitive, it offers all the features you'd expect. Every user can find what they need when they want to enjoy a little TV on their smartphone. Here, we also find an integrated video player, support for Google Chromecast, a Parental Control function, support for M3U lists and automatic updates of the EPG.

IPTV Extreme
TVCast

TVCast differs from the others on this thanks to its simple and minimal interface in line with Google's Material Design, which leaves no room for doubt. It supports both M3U and M3U8 and is available free of charge. As you may have guessed from the name, this application is oriented to content casting: in fact, it can broadcast the contents of its channel list on a variety of devices, including Amazon Fire TV, Roku, Apple TV, Chromecast and the TVCast Web Player (the proprietary software to be able to transmit to your PC).

The minimalist design of the interface is what makes TV cast stand out. / © Play StoreTVCast - Watch IPTV everywhere
IPTV

The name of this application is practically a guarantee for variety. Although it does not have the most beautiful graphical interface ever, IPTV is the preferred app for over 10 million users. Among its best features, you will find frequent updates, speed, excellent integrated player, support for M3U and XSPF lists, support for EPG, the option to display the channel list in three modes (list, grid or titles) and automatic reconnection in case of buffering or blocks.

IPTV is the favorite app for over 10 million users. / © Play StoreIPTV

Which is your app of choice when it comes to watching TV channels on your smartphone or tablet? Let us know in the comments below.Also Read:jihosoft Free iPhone Data Recovery

Sponsor ads:

Gihosoft Free iPhone Data Recovery:https://www.gihosoft.com/iphone-data-recovery-free.html

Gihosoft iPhone Data Recovery Free

Free iPhone Data Recovery Software for Windows/Mac

Recover up to 12+ types of files, including contacts, SMS, photos, WhatsApp, Viber, notes, etc.

Restore lost data from iOS devices directly or from iTunes and iCloud backup

Recover iPhone data lost due to iOS upgrade/jailbreak, accidental deletion, device lost or broken

Support all the latest iPhone, iPad and iPod Touch

Both Free and Pro version.

If you lost data after you updated to a new iPhone, you can always use Gihosoft iPhone Data Recovery to get the data back from the old iPhone or backup.You may also like: iphonerecovery.com

If you use android phones, please choose Gihosoft Android Data Recovery.

With Gihosoft Android Data Recovery, no longer afraid of data loss!

Must read:Youtube video downloader for pc

Gihosoft RePicvid Free Photo Recovery Software provides a free photo recovery software for windows to help users recover the deleted or lost photo for free.

Jihosoft Android Data Recovery: the best Android Data Recovery software for Windows and Mac to recover deleted contacts, messages, photos, videos, WhatsApp and etc from Android devices.Tips:How to transfer messages from iPhone to iPhone

Jihosoft File Recovery:Recover deleted, Lost, formatted, or corrupted files from PC, flash drive and memory card easily & safely 

Also Read:Top 9 Best Alternative Websites to AudioBook Bay in 2019

Also Read:4 Best iOS Cleaner Apps to Clear Junk on iPhone/iPad in 2019

Also Read:How to Make Your Phone Number Private on Android or iPhone

Also Read:How to Fix Your iPhone Microphone Not Working (iOS 12 Supported)


Tuesday, March 5, 2019

Download iOS 12.2 Beta 4 without developer account 2019

Download iOS 12.2 Beta 4 without developer account 2019

Apple just seeded the fourth developer beta of iOS 12.2 update to developers. Here’s how you can download and install it on your iPhone, iPad, and iPod touch.

Table of Contents


What’s new in iOS 12.2 Beta 4?


iOS 12.2 Beta 4 Download


OTA Profile


iPhone


iPad


iPod


Should you upgrade?
WHAT’S NEW IN IOS 12.2 BETA 4?

iOS 12.2 Beta 4 comes with a build number of 16E5212f and weighs about 400MB on compatible models.

Owing to its size, the fourth beta version brings bug fixes and improvements without adding any new features.

Although Apple has yet to disclose the changelog, users can expect a fix for LTE connectivity issues present in older versions.


You can get this update directly from the Apple Developer Center. This, however, requires you to possess a paid developer account.

If you are an average user looking to upgrade your iPhone or iPad, download the OTA profile given below.

Alternatively, you can use the IPSW firmware compatible with your device and upgrade via iTunes.
IOS 12.2 BETA 4 DOWNLOAD
OTA PROFILE


Download


IPHONE


iPhone SE, iPhone 5s


iPhone 6s, iPhone 6


iPhone 6s Plus, iPhone 6 Plus


iPhone 8, iPhone 7


iPhone 8 Plus, iPhone 7 Plus


iPhone X


iPhone XS


iPhone XS Max


iPhone XR
IPAD


iPad Air, iPad mini 2


iPad mini 4, iPad Air 2, iPad mini 3


iPad (5th generation), iPad (6th generation)


iPad Pro (9.7‑inch)


iPad Pro (12.9‑inch)


iPad Pro (10.5-inch), iPad Pro (12.9-inch) (2nd generation)


iPad Pro (11-inch), iPad Pro (12.9-inch) (3rd generation)
IPOD


iPod. touch (6th generation)
SHOULD YOU UPGRADE?

Unfortunately, we don’t know whether or not Apple has released a fix for the LTE connectivity problem that was plaguing users on iOS 12.2.

Nonetheless, you should consider updating your device if you were afflicted by this issue.

If you are an avid jailbreaker, stay away from any firmware update and stick to any version below iOS 12.1.2.
Also Read:Top 5 Best Similar Sites to Kickass Torrents 2019

Also Read:jihosoft Free iPhone Data Recovery

Sponsor ads:

Gihosoft Free iPhone Data Recovery:https://www.gihosoft.com/iphone-data-recovery-free.html

Gihosoft iPhone Data Recovery Free

Free iPhone Data Recovery Software for Windows/Mac

Recover up to 12+ types of files, including contacts, SMS, photos, WhatsApp, Viber, notes, etc.

Restore lost data from iOS devices directly or from iTunes and iCloud backup

Recover iPhone data lost due to iOS upgrade/jailbreak, accidental deletion, device lost or broken

Support all the latest iPhone, iPad and iPod Touch

Both Free and Pro version.

If you lost data after you updated to a new iPhone, you can always use Gihosoft iPhone Data Recovery to get the data back from the old iPhone or backup.You may also like: iphonerecovery.com

If you use android phones, please choose Gihosoft Android Data Recovery.

With Gihosoft Android Data Recovery, no longer afraid of data loss!

Must read:Youtube video downloader for pc

Gihosoft RePicvid Free Photo Recovery Software provides a free photo recovery software for windows to help users recover the deleted or lost photo for free.

Jihosoft Android Data Recovery: the best Android Data Recovery software for Windows and Mac to recover deleted contacts, messages, photos, videos, WhatsApp and etc from Android devices.Tips:How to transfer messages from iPhone to iPhone

Monday, March 4, 2019

Recover WhatsApp Chats by Restoring WhatsApp Backup 2019


Recover WhatsApp Chats by Restoring WhatsApp Backup

If you have backed up WhatsApp messages to iCloud from WhatsApp the app itself, you can follow the process of WhatsApp backup restoring to recover WhatsApp chats even after factory reset. Following is the guide to restore them.

Install WhatsApp from App Store again and make sure to configure iPhone with same iCloud details as the old one that you used for backup. Now, after successful installation, enter your phone number to verify the login and you’ll get ‘Restore Chat History’ option. Tap on it and follow the onscreen instructions. Within a while, all your WhatsApp chats will be recovered.


Also Read:jihosoft Free iPhone Data Recovery

Sponsor ads:

Gihosoft Free iPhone Data Recovery:https://www.gihosoft.com/iphone-data-recovery-free.html

Gihosoft iPhone Data Recovery Free

Free iPhone Data Recovery Software for Windows/Mac

Recover up to 12+ types of files, including contacts, SMS, photos, WhatsApp, Viber, notes, etc.

Restore lost data from iOS devices directly or from iTunes and iCloud backup

Recover iPhone data lost due to iOS upgrade/jailbreak, accidental deletion, device lost or broken

Support all the latest iPhone, iPad and iPod Touch

Both Free and Pro version.

If you lost data after you updated to a new iPhone, you can always use Gihosoft iPhone Data Recovery to get the data back from the old iPhone or backup.You may also like: iphonerecovery.com
If you use android phones, please choose Gihosoft Android Data Recovery.
With Gihosoft Android Data Recovery, no longer afraid of data loss!

Must read:Youtube video downloader for pc

Gihosoft RePicvid Free Photo Recovery Software provides a free photo recovery software for windows to help users recover the deleted or lost photo for free.

Jihosoft Android Data Recovery: the best Android Data Recovery software for Windows and Mac to recover deleted contacts, messages, photos, videos, WhatsApp and etc from Android devices.Tips:How to transfer messages from iPhone to iPhone

Friday, March 1, 2019

How to Get Notes Directly Out of the Locked iPhone 2019


1. How to Get Notes Directly Out of the Locked iPhone

Retrieving notes out of locked iPhone can be done in a couple of ways which we are going to discover in the later part of the article. But now, in this first section we're going to discuss about how to get notes directly out of a locked iPhone. For this, you have to make use of iTunes software on your computer.

Note: This method works conditionally. Please ensure to connect your device only to a trusted computer, which means on which you previously synced your device with iTunes. For some devices, this method may not work. You can just have a test to see if there is the option for you to back up your iPhone or not when it is connected to iTunes.

Step 1 - Launch iTunes on your PC. Now, get your iPhone plugged into your PC using a genuine lightning cable.

Step 2 - Click on the iPhone icon available on the top left and see if the 'Back Up Now' button is available under the 'Summary' page. If yes, then hit on it and wait for the backup to complete.

On completion you will have an iTunes backup containing all your notes stored on your iPhone. You can restore it to your iPhone after you reset your locked iPhone.


2. Download Notes from iCloud.com

Since you are locked out of your iPhone and can't access it, you have to find other ways to get the notes out. If you have enabled 'Notes' in iCloud Backup settings on your iPhone, your notes must have been synced to iCloud.com. You can just log into your iCloud and you will be able to see the notes on your locked iPhone. You can just copy the notes from iCloud.com and paste them in a document to store them on your computer. Here are the steps:

Step 1 - Head to the official 'iCloud.com' website and login to your iCloud account using your 'Apple ID' credentials.

Step 2 - Now, you need to select the 'Notes' icon from the iCloud's launchpad screen. You'll now be brought to 'iCloud Notes'. This is where all your iPhone's notes are synced to.

Step 3 - If you can see your notes on 'iCloud Notes' screen, then Congratulations! You now need to simply copy and paste each of your notes over iCloud to your computer one by one.

That's about it. You have now successfully retrieved notes out of locked iPhone using your iCloud account.


Note: If you aren't able to find any of your locked iPhone's notes over your iCloud account, then don't feel dejected. We're not done yet. We still have got another way for you. Read the next solution to get notes out of a locked iPhone using an iTunes or iCloud backup.Sponsor ads:

Gihosoft Free iPhone Data Recovery:https://www.gihosoft.com/iphone-data-recovery-free.html

Gihosoft iPhone Data Recovery Free

Free iPhone Data Recovery Software for Windows/Mac

Recover up to 12+ types of files, including contacts, SMS, photos, WhatsApp, Viber, notes, etc.

Restore lost data from iOS devices directly or from iTunes and iCloud backup

Recover iPhone data lost due to iOS upgrade/jailbreak, accidental deletion, device lost or broken

Support all the latest iPhone, iPad and iPod Touch

Both Free and Pro version.

If you lost data after you updated to a new iPhone, you can always use Gihosoft iPhone Data Recovery to get the data back from the old iPhone or backup.You may also like: iphonerecovery.com

If you use android phones, please choose Gihosoft Android Data Recovery.

With Gihosoft Android Data Recovery, no longer afraid of data loss!

Must read:Youtube video downloader for pc

Gihosoft RePicvid Free Photo Recovery Software provides a free photo recovery software for windows to help users recover the deleted or lost photo for free.

Jihosoft Android Data Recovery: the best Android Data Recovery software for Windows and Mac to recover deleted contacts, messages, photos, videos, WhatsApp and etc from Android devices.Tips:How to transfer messages from iPhone to iPhone

jihosoft Free iPhone Data Recovery

How to Delete Recent Calls on iPhone


Part 1: How to Delete Recent Calls on iPhone
A) Deleting Single Calls

Users who want to delete single iPhone recent calls on their iPhone can follow these simple steps:

Also Read:4 Best Chrome Extensions to Download YouTube Videos

Also Read:Top 5 Legal Websites to Download Free Ringtones for iPhone XS/X/8/7/6s/6

Also Read:How to Go Live on Tik Tok/Musical.ly in 2019

Step 1: Go to the home screen of your phone and tap on the phone icon.

Step 2: Click on the “recents” tab.

Step 3: Find the phone number you want to delete and swipe it left with your finger.

Step 4: Click the red delete button. This will remove a single number from your iPhone.


B) Deleting Multiple Calls

Users who want to delete multiple calls on their iPhone can follow these simple steps:

Step 1: Go to the home screen of your phone and tap on the phone icon.

Step 2: Click on the recents tab.

Step 3: At the top of your screen, you will see two options - “All” and “Missed”. Make sure the “All” tab is highlighted.

Step 4: Click on the “edit” option in the top right hand corner of your screen. This will make little red minus signs appear before each phone number.

Step 5: Find the number you want to delete and tap on the red minus sign beside it.

Step 6: Click delete.

Step 7: Repeat steps 5 and 6 for any additional numbers you wish to delete from your phone.


C) Deleting All Calls

Users who want to delete all recent calls from their iPhone can follow these simple steps:

Step 1: Go to the home screen of your phone and click on the phone icon.

Step 2: Click on the recents tab.

Step 3: Click on the edit option in the right hand corner of your screen.

Step 4: Click the “clear” option in the left hand corner of your screen. This will make a pop-up appear. Also Read:How to Make a Folder Password Protected

Step 5: On the pop-up, click “clear all recents”.

This will make all iPhone recent calls disappear. If you like, you can perform the same steps under the “missed” calls tab to delete calls appearing there.


Part 2: How to Delete Recent Calls Permanently

Did you know that when you delete recent calls from your iPhone, they’re not actually deleted? Sure, you can’t see them anymore, but that doesn’t mean them 100% gone. Even though you cannot see the data stored on your iPhone, it’s actually still there. This means that if someone who is “tech savvy” gets ahold of your phone, they can still have access to all of your call logs.

And unfortunately, iPhone doesn’t offer many options for permanently deleting your calls or logs. This is why so many people are now turning to alternative software solutions like iMyFone Umate Pro for Windows or iMyFone Umate Pro for Mac to permanently delete their data.

Review: Clean up iTunes with CleanMyMac 3


Review: Clean up iTunes with CleanMyMac 3 2019

CleanMyMac 3 is a simple and useful application for keeping your Mac clean, maintained and healthy. It’s known for optimizing users experience on Mac by scanning every inch of your system, removing gigabytes of junk files and monitoring the health of your Mac.

One of its special feature called iTunes Junk is to clean up iTunes. It will cleans out all sorts of junk files in iTunes that most users don’t notice.
Key Features of “iTunes Junk”


Has the capacity to clean hidden iTunes junk files that most people don’t know exist in the Mac.


Remove outdated iOS device backups. It keeps the latest versions of iOS device backups while erasing the rest.


Broken Downloads that were not completed in iTunes can be easily located and erased.


Also erase old software updates in iTunes to make space for more apps and files.


Copies of iOS apps stored on your hard drive can be scanned and deleted.


Pros


Easy to use.


Fairly scans your Mac for iTunes junks in order to erase them.


2-click cleanup feature.


Fairly speeds up your Mac and iTunes.

Cons


Not affordable to many macOS users. It doesn’t provide Windows version, which keeps Windows users away.


It does not offer deep cleaning for iTunes junks.


It should supports more file types to clean because there are lots of other junk files stored in iTunes.Sponsor ads:


Gihosoft Free iPhone Data Recovery:https://www.gihosoft.com/iphone-data-recovery-free.html


Gihosoft iPhone Data Recovery Free


Free iPhone Data Recovery Software for Windows/Mac


Recover up to 12+ types of files, including contacts, SMS, photos, WhatsApp, Viber, notes, etc.


Restore lost data from iOS devices directly or from iTunes and iCloud backup


Recover iPhone data lost due to iOS upgrade/jailbreak, accidental deletion, device lost or broken


Support all the latest iPhone, iPad and iPod Touch


Both Free and Pro version.


If you lost data after you updated to a new iPhone, you can always use Gihosoft iPhone Data Recovery to get the data back from the old iPhone or backup.You may also like: iphonerecovery.com


If you use android phones, please choose Gihosoft Android Data Recovery.


With Gihosoft Android Data Recovery, no longer afraid of data loss!


Must read:Youtube video downloader for pc


Gihosoft RePicvid Free Photo Recovery Software provides a free photo recovery software for windows to help users recover the deleted or lost photo for free.


Jihosoft Android Data Recovery: the best Android Data Recovery software for Windows and Mac to recover deleted contacts, messages, photos, videos, WhatsApp and etc from Android devices.Tips:How to transfer messages from iPhone to iPhone


jihosoft Free iPhone Data Recovery

How to Enable Spatial Sound in Windows 11

  How to Enable Spatial Sound in Windows 11 Here's how to enable  Spatial Sound  in Windows 11: Open Settings by pressing Windows key + ...