Thursday, June 27, 2019

Tips & Tricks on How to Fix Outlook Not Working on iPhone


1. 6 Simple Checks to Fix Outlook Not Working on iPhone

If you have encounter this problem, do not hurry to try the advanced ways. There are some simple checks you can use at the first time. Please note that if there is something wrong with the software or hardware, the methods in this part are not enough to help you.
Way 1. Check Mail Days to Sync Settings

Now check the related settings first.

Step 1: Go to Settings -> Passwords & Accounts.

Step 2: Tap the Outlook account that you have already set up and select Mail Days to Sync.

Step 3: Choose No Limit. You can also choose other options shown here. But all your emails will sync if you choose No Limit.

Step 4: All your emails will sync in a while after choosing an option.


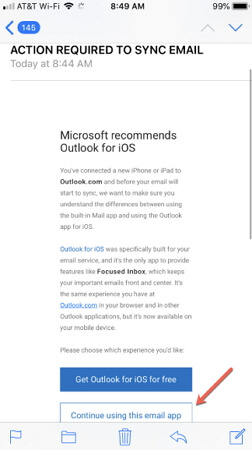
Way 2. Action Required to Sync Email

If you are missing all your emails then you may have forgotten to connect your Outlook account to the stock Mail app.

Step 1: First, open the email that you received from Microsoft.

Step 2: Tap "Continue using this email app" that will be at the bottom of the email. This will connect the account to the Mail app.


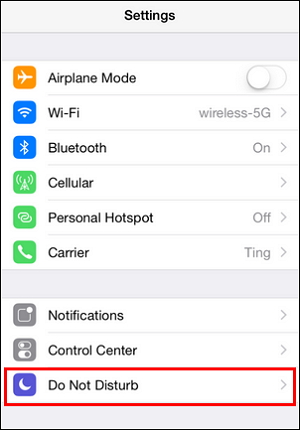
Way 3. Disable Do Not Disturb

If you have enabled Do Not Disturb, you will not get any email notifications on the lock screen. So, check and disable it.

Step 1: Go to Settings -> Do Not Disturb.

Step 2: If it is on, toggle it off. You can also do this from Control Center.


Way 4. Reset Network Settings

There might be an issue with network settings on your iPhone. Reset it and see if the problem gets solved or not.

Step 1: Go to Settings -> General.

Step 2: Scroll down and tap on "Reset".

Step 3: Now, tap on "Reset Network Settings" and enter the passcode and confirm.


Way 5. Enable Fetch New Data

If you are not receiving any email, you need to check and enable Fetch New Data.

Step 1: Go to Settings -> Passwords & Accounts.

Step 2: Tap on Fetch New Data.

Step 3: Toggle on "Push". This will push new data to your iPhone from the server.


Way 6. Toggle Airplane Mode on and off

This method has been effective in solving network issues that arise on your iPhone. If Outlook is not working properly, the chances are that there is an issue with your network.

Step 1: Open Settings and toggle on Airplane Mode.

Step 2: Wait for a few seconds and then toggle off Airplane Mode.

You can also do this from Control Center. From the Control Center, just tap on the Airplane Mode symbol to turn it on and off.


2. Fix Outlook Not Working on iPhone with Software-Related Issue

Most of the time, this kind of issue might be caused by some software glitches. So the simple checks on settings cannot solve this for you. Now find more advanced ways in this part to fix it.
Way 1. Reinstall Outlook App on iPhone

You can try to reinstall the Outlook app on your iPhone if you are unable to send or receive emails.

Step 1: Tap on the Outlook app until it starts jiggling.

Step 2: Tap on the (x) symbol at top of the icon to delete the app.

Step 3: After a few minutes, go to App Store and download the app.


Way 2. Remove Outlook Account and Add it Again

Try to remove the Outlook account that you have added before and add it back to solve this problem.

Step 1: Go to Settings -> Passwords & Accounts.

Step 2: Select the Outlook account and tap on "Delete Account".

Step 3: After a few seconds, add the account again.

Sponsor ads:

Gihosoft RePicvid Free Photo Recovery Software provides a free photo recovery software for windows to help users recover the deleted or lost photo for free.

If you lost data after you updated to a new iPhone, you can always use Gihosoft iPhone Data Recovery to get the data back from the old iPhone or backup.You may also like: iphonerecovery.com

iPhone Manager:Get the ultimate Gihosoft iPhone Manager. Free download for PC/Mac.

Read more:Go Live on Tik Tok/Musical.ly in 2019

Read more:best youtube downloader

Monday, June 24, 2019

How to Sign Up and Install iOS 13 or iPadOS 13 Public Beta


Apple today released the first public beta of iOS 13, iPadOS 13, and macOS Catalina. If you are not already running the developer beta of these operating systems on your device and want to join the public beta program, follow this guide.

The first public beta of iOS 13, iPadOS 13, and macOS Catalina carries the same build number as the second developer beta released by Apple last week.
How to Install iOS 13 or iPadOS 13 Public Beta

It is highly recommended that you create a backup of your iPhone, iPad, or Mac before installing the public beta.

Step 1: Head over to Apple’s beta program website and click on the Sign Up/Sign in button.


Step 2: From the page that opens, select the OS whose beta program you want to join.

Under the second point of the guide, you will find the link to download the beta profile or the macOS Public Beta utility.

For iPhone and iPad, you will need to visit this website from the device itself. Download the beta profile from the link and proceed to install it.

With the beta profile installed, restart your iPhone, iPad, or Mac. Then on your iOS device, head over to Settings -> General -> Software Update and you should see the iOS 13/iPadOS 13 public beta update available for download.

For Macs, go to System Preferences -> Software Update to download the macOS Catalina public beta after installing the public beta utility.

Check out our articles to discover all the new iOS 13 and iPad OS features so you can make the most of the beta:


100+ New iOS 13 Features


All the iOS 13 and iPadOS 13 Gestures You Must Know

Sponsor ads:

Gihosoft RePicvid Free Photo Recovery Software provides a free photo recovery software for windows to help users recover the deleted or lost photo for free.

If you lost data after you updated to a new iPhone, you can always use Gihosoft iPhone Data Recovery to get the data back from the old iPhone or backup.You may also like: iphonerecovery.com

iPhone Manager:Get the ultimate Gihosoft iPhone Manager. Free download for PC/Mac.

Read more:Go Live on Tik Tok/Musical.ly in 2019

Read more:best youtube downloader

Sunday, June 23, 2019

How to Bypass FRP with Vnrom


How to Bypass FRP with Vnrom

Site: https://vnrom.net/bypass/

As we had mentioned earlier on, bypass FRP Vnrom is a solution developed to help bypass the Google FRP lock even without having to enter the Google Account password. The tool appears to be supporting quite a number of Android device models, including, Samsung, Oppo, and Asus.

The main website for bypass FRP Vnrom is not very clear on whether the tool is capable of removing the Android device from the previous Google account. There is no guarantee that when you use the tool to bypass the FRP on your device you will have the ability to use a different Google Account. You need to figure it out by yourself.
How to Use Bypass FRP Vnrom:


Go to Vnrom website and download the APK to your USB drive.


Open your Android device and try to set it up. When it asks to verify your account, connect the USB drive to your device with an OTG cable.


On your device, try to install the APK from the USB drive.


When it’s done, go to settings and perform the factory reset.


When your iPhone gets rebooted, you can successfully set up your device without verifying the previous account.


Cons

Although bypass FRP Vnrom may be able to help you bypass the FRP lock and enjoy more features on the Android phone, it has a number of limitations. These limitations include:


You need to prepare a USB drive and an OTG cable which is not the same as USB cable. You can purchase it from Amazon.


You may not have the ability to remove the Android device from the old Google Account after using bypass FRP Vnrom.


Since it has not been updated for a long time, the tool may not work on the latest Android versions, including Android 9.0.


Vnrom doesn’t provide entrance of support when you have any inquiry.


There is no guarantee you will have the ability to sync the Android device with a new Google Account after using bypass FRP Vnrom.Read more:vidics alternatives


Read more:football live streaming sites


Read more:fmovies to


Read more:pubfilm alternatives


Read more:best android equalizer


Thursday, June 6, 2019

Top 10 Annoying Things Apple Fixed in iOS 13 and iPadOS 13


Top 10 Annoyances Apple Fixed with iOS 13 and iPadOS 13

In this list, we’re only going to talk about the new features that fixed major annoyances. If you’re looking for a list of all major features in iOS 13 and iPadOS 13, we’ve got you covered. Check out our What’s New in iOS 13 and Whats’ New in iPadOS 13 guides to know more.
1. Volume HUD and Ringer HUD


The volume HUD has been redesigned and now shows up next to the volume buttons on the iPhone. In landscape mode and on the iPad, it’s at the top of the screen.

Volume HUD starts out quick thick but when you press the volume button twice it shrinks to take up a very small space.


Apple also redesigned the Silent Mode alert. Now it comes from the top of the screen in a pill-shaped drop-down.
2. Wi-Fi and Bluetooth in Control Center


If you tap and hold on the Wi-Fi or Bluetooth controls in Control Center you’ll be able to see a list of all available networks and you can quickly switch between them. Another longstanding item from the running iOS wishlist gets checked off.
3. Unlimited Cellular Download Size


Apple has also removed the 200MB size limit for app downloads over cellular data. When you try to download a huge app, Apple will confirm if you really want to go forward. But you can disable this popup itself from Settings.
4. Multiple App Instances for iPad


The iPad is growing up and turning into a real computer. Right alongside desktop class Safari, this was one of the most annoying limitations of using an iPad. You can now open multiple instances of the same app, across multiple spaces. You can, in theory, have 12 different windows of Safari running, each with multiple tabs and still manage it all easily using App Expose.
5. Mouse support for iPad (Accessibility)


Steve Troughton-Smith


@stroughtonsmith

Hello mouse support on iOS 13! It’s an AssistiveTouch feature, and works with USB mice. @viticci nailed this

6,498

5:05 AM - Jun 4, 2019

2,334 people are talking about this

Twitter Ads info and privacy

Apple has added mouse support for iPad. The only issue is that it’s an Accessibility feature. But once enabled you can connect wired and wireless mice to the iPad and use them to move around, click on things and more.

We hope that at some point, Apple removes this feature from Accessibility and brings it as an option for anyone who is interested in using the iPad with a pointing device.
6. USB-C External Storage and SD card Support


Files app in iPadOS 13 finally works with external storage. This was one of the biggest things stopping the iPad from becoming a real computer.

This means you can connect an external hard drive, a flash drive or even an SD card to the iPad to transfer files directly.

Files app will read it as a storage and will let you interact with it using other apps as well. You’ll be able to save data from apps to external storage. You’ll also be able to directly import photos from SD Card to an app like Lightroom without going through Files first.
7. Desktop Class Safari


Another one of our major wishes came true this year. Safari in iPadOS 13 is a desktop-class browser that’s customized for the tablet screen. It actually runs desktop websites like YouTube, Google Sheets, Google Docs, WordPress and more. Apple is promising a smooth and powerful desktop experience. Another finally for the iPad.

Browsing productivity related websites on the iPad was always frustrating. Now it won’t be.
8. Much Better Text Selection and Editing

Apple is finally taking text selection seriously. You can now just tap and hold on the cursor to pick it up and instantly move it around.

Selecting a block of text is much simpler now. Just tap on a word and instantly swipe to where you want to select, like the end of the paragraph. iPadOS will select all the text in between the two points.

Once the text is selected, you can use gestures to copy it. Just pinch in with three fingers to copy, pinch out with three fingers to paste and swipe back with three fingers to undo typing or action.
9. iPad Home Screen


Apple has also tweaked the iPad Home screen grid so that you now have a row of 6 icons on the 11 inch iPad Pro. If you swipe in from the left edge of the Home screen, you’ll find that the Today View widgets will be docked to the left edge. And you can see and use all your widgets easily. But you can also pit it so that it’s always available (from the Edit menu).
10. New Now Playing Design in Apple Music


This one is kind of a glass-half-full feature. The good news is that Apple got rid of the old Now Playing screen from iOS 10. This is where all the features like Shuffle, Repeat, Lyrics, and Up Next were hidden behind the scroll view. And there was no indication anywhere that you could scroll on that screen.

Finally, that scrolling view is gone. Apple replaced it with two tabs. One for Lyrics and one for Up Next. This is quite sensible. And will be much easier to discover. The only issue is that Apple has crammed the Shuffle and Repeat buttons in a small corner of the Up Next tab. They are visually faded and difficult to hit. We hope that Apple changes the design a bit to make the bigger.

But overall the Now Playing screen resign is for the better.
Other Small Hidden Features and Changes in iOS 13 and iPadOS 13

There are more smaller hidden feature across iOS 13 and iPadOS 13 that go further to reduce the day-to-day annoyance of using an iPhone and iPad. For example, there’s a new feature that will automatically silence all calls from unknown callers.

We’ve highlighted that feature and more in our detailed guide to hidden features in iOS 13 and iPadOS 13 so make sure you take a look at that.

What are your favorite new annoyance-killing features in iOS 13 and iPadOS 13? Share with us in the comments below.

Sponsor ads:

Gihosoft RePicvid Free Photo Recovery Software provides a free photo recovery software for windows to help users recover the deleted or lost photo for free.

If you lost data after you updated to a new iPhone, you can always use Gihosoft iPhone Data Recovery to get the data back from the old iPhone or backup.You may also like: iphonerecovery.com

If you use android phones, please choose Gihosoft Android Data Recovery.With Gihosoft Android Data Recovery, no longer afraid of data loss!

iPhone Manager:Get the ultimate Gihosoft iPhone Manager. Free download for PC/Mac.

Wednesday, June 5, 2019

A Group of Fraudsters Managed to Steal $19 Million Worth of iPhones in the past Several Years


It is no secret that when it comes to stealing phones, thieves prefer iPhone! The latest heist was orchestrated by a New York Based group of fraudsters. The fraudsters used identity theft to steal $19 million worth of iPhones and then sold it in the black market. Apparently, the fraudsters ran the scam successfully for many years.

Modus Operandi

The associates used identity theft and posed as cellphone subscribers to get new devices. They got new devices for as little as nothing and this meant that the transaction didn’t raise any red flags.

In the next stage, the associates visited the mobile phone stores with fake debit cards and posed as legitimate customers. The payment for the phone was spread across several months and the victim would only be alerted after he saw the bill. Needless to say, by then the associates would have disappeared in thin air.

The Police Report reads as follows,

Since in or around 2014, the NYPD and the Federal Bureau of Investigation (“FBI”) have been investigating a group of individuals – the “Fraud Ring” – who operated in, among other places, the Southern District of New York, including the Bronx, Manhattan, and Westchester County. From at least 2012 to the present, the Fraud Ring perpetrated a wide-ranging scheme to obtain valuable, new electronic devices, predominantly Apple iPhones.

During the course of the conspiracy, the Fraud Ring fraudulently obtained more than $19 million worth of devices. To facilitate the scheme, the Fraud Ring traveled to approximately 34 different states, but often brought or shipped the fraudulently obtained cellphones back to the Bronx, where they regularly sold them through fencing operations.

It is worth noting that the Fraud Ring compromised of multiple levels and the low-level criminals are now giving evidence against the others for a reduced sentence. Below is an excerpt of the charges filed by the prosecutor.

The Fraud Ring would typically send participants on “trips,” fanning out across the country to fraudulently acquire iPhones. The Fraud Ring’s participants held differing roles within the ring: At the top were the Fraud Ring’s leaders, termed “Top Dogs” by the Fraud Ring’s participants. Top Dogs organized and funded trips, sold fraudulently obtained iPhones and made the lion’s share of the profits. Second were participants who worked with the stolen PII and forged identifying materials. Finally, the Fraud Ring included lower-level trip participants, the runners and drivers, who were actually responsible for using the stolen PII to fraudulently acquire iPhones and then shipping the phones back to Top Dogs in the New York City area.

The informant said that $100 was paid for each iPhone that they obtained from the store. The worst part is that victims will be bearing the brunt of the fraud. It is very important to safeguard ourselves from identity theft and phishing scams. We hope the victims get justice while the perpetrators are put behind the bar.Also Read:Adult Games for Android in 2019

Also Read:Best Project Free TV Alternative

Also Read:22 Best Websites Alternative to RouletteB in 2019

Also Read:Forward Calls on iPhone Xs/X/8/7/6s for Busy Time

Also Read:7 Best Alternatives to Megashare for Movie Watching in 2019

Also Read:Unbrick Your Bricked iPhone XS/XR/X/8/7 in 2019


[Via-9to5Mac]

Monday, June 3, 2019

Download iOS 13 Beta 1 without developer account


WHAT’S NEW IN IOS 13?

As expected, Apple has unveiled its next operating system iteration – iOS 13 – at WWDC 2019. Unlike iOS 12, which was just an overhauled version of iOS 11, iOS 13 brings several new features and enhancements, namely –
SYSTEM-WIDE DARK MODE

A system-wide dark mode is easily the most requested feature of the past few years months. Thankfully, it’s now a part of the stock operating system.

Just like Noctis and Eclipse 12, this feature allows you to change the native white interface of iOS to a dark version at the touch of a button, making your nighttime experience much more productive.


All stock Apple applications such as Music and Messages are fully dark mode-ready. The share sheet also has a dark tint and automatically displays as suggestions the devices you regularly send files to.

Almost all popular apps already come with a built-in night mode. Beginning with iOS 13, you can apply dark color to everything in the system just like macOS Mojave that received this feature a year ago.
SIGN IN WITH APPLE

Many online services and portals give users the option to log in using their Facebook or Google ID and password. In the same vein, Apple has launched a new privacy feature called “Sign in with Apple” that help you sign in using your Apple ID credentials.

As soon as you press this button to sign in, no location data is shared with any third-party. You will be in full control of your personal information whenever a website makes requests to access it.


iOS 13 can also create a temporary email ID for you if you don’t want a website to access or store your email. This “burner” email address will forward all received emails to your primary email address.
IMPROVED EDITING FEATURES IN THE PHOTOS APP

The stock Photos app gets major improvements in the editing department. Photo editing options are now also available for videos allowing you to modify saturation, rotation, color balance, and other attributes without purchasing a separate editing application from App Store.


Apple has also rejigged the photo library on iOS 13. The same photos will be stacked on top of each other, ensuring that variations of the same photo don’t fill up your camera roll.
ENHANCED APP DOWNLOAD AND UPDATE SPEED

Beginning with iOS 13, users will have to wait less to install new apps and app updates from the App Store.

The latest operating system update by Apple boosts the download speed of app updates by a whopping 60% and enhances the download speed of new apps from App Store by 50%.

Any app you open on an iPhone or iPad running iOS 13 is now opened twice as fast as in iOS 12.
AIRPODS, CARPLAY, HOMEPOD, AND OTHER NEW FEATURES

Users can now set AirPods to automatically read incoming messages and immediately respond to them. You can also listen to the same music together with two different sets of AirPods with the all-new music sharing feature.

The HomePod supports Handoff, allowing you to transfer the music you listen to on the move directly to your HomePod by simply holding your iPhone next to the speaker.


CarPlay also gets a design refresh and better built-in support for Siri. The smart assistant also gets an improved voice thanks to Neural TTS (Text-To-Speech).

Although this update is available only for registered developers, you can get its IPSW firmware file using the download links given below. Once you have the requisite compatible file, fire up iTunes and upgrade your device using it.
IOS 13 BETA 1 DOWNLOAD
IPHONE


iPhone 6s


iPhone 6s Plus


iPhone SE


iPhone 8, iPhone 7


iPhone 8 Plus, iPhone 7 Plus


iPhone X


iPhone XS Max, iPhone XS


iPhone XR
IPAD


iPad mini 4, iPad Air 2


iPad (5th generation), iPad (6th generation)


iPad Pro (9.7‑inch)


iPad Pro (12.9‑inch)


iPad Pro (10.5-inch), iPad Pro (12.9-inch)(2nd generation)


iPad Pro (11-inch), iPad Pro (12.9-inch)(3rd generation)


iPad mini (5th generation), iPad Air (3rd generation)
IPOD


iPod touch (7th generation)


iPod touch (6th generation)
XCODE


Xcode_11_Beta
IS IOS 13 WORTH AN UPGRADE?

iOS 13 comes with a lot of new features and enhancements but the current iteration is still a developer beta after all. These versions are known to have bugs, glitches, and vulnerabilities, which makes it unsuitable for use by the average user.

Even though you can download the developer beta, it will take a while before everyone can officially install it on their iPhone, iPad, or iPod.


Developer versions are intended for use by developers only, so they can test and fine-tune their applications and games in accordance with the new software.

Therefore, we recommend waiting for the first public beta update, which Apple will hopefully release to the general public at the end of this month. Apple will then seed the subsequent versions until the final stable release takes place in September.

Sponsor ads:

Gihosoft RePicvid Free Photo Recovery Software provides a free photo recovery software for windows to help users recover the deleted or lost photo for free.

If you lost data after you updated to a new iPhone, you can always use Gihosoft iPhone Data Recovery to get the data back from the old iPhone or backup.You may also like: iphonerecovery.com

If you use android phones, please choose Gihosoft Android Data Recovery.With Gihosoft Android Data Recovery, no longer afraid of data loss!

iPhone Manager:Get the ultimate Gihosoft iPhone Manager. Free download for PC/Mac.

How to Install iPadOS 13 Beta on iPad, iPad Pro


Looking to install iPadOS developer beta on your iPad or iPad Pro? Well, the first thing you need to know is that you will have to download the entire IPSW file as the old beta profile hack no longer works. If you are still determined on installing iPadOS on your iPad, follow this guide.

The steps to install the iPadOS developer beta are very different from last time around. That’s because Apple has not made the beta profile configuration file available like the last few years. Plus, to install the iPadOS beta, there are quite a few other pre-requisites that need to be fulfilled.
Pre-requisites to Install iPadOS Beta


Your Mac must be running macOS 10.15 beta or Xcode 11 beta.


You need to use iTunes to install the iPadOS IPSW file. There’s no other workaround to this.


Steady internet connection.


Make sure your iPad or iPad Pro is compatible with iPadOS 13.
Install iPadOS 13 Beta on iPad, iPad Pro

Step 1: Download the iPadOS 13 beta 1 on your Mac.

Step 2: Open iTunes and connect your iPad to your Mac. If you are connecting your iPhone for the first time, accept the prompt on the device and enter the passcode.

Step 3: Your iPad should then be detected by iTunes. Tap on the iPad logo on the top-right corner of the sidebar.


Step 4: From the Summary panel, hold the Option/Alt key and click the Check for Update button. In the window that opens, select the iPadOS 13 beta 1 IPSW file you downloaded in step 1.

Step 5: The installation process will now start. Your iPad will restart during the process. Once done, go through the initial setup process and set up your iPad again. Your iPad must be connected to the internet for activation purposes during this.Also Read:Free Online Movie Streaming Sites in 2019

Also Read:log out of Facebook Messenger

Also Read:Free Audio MP3 Cutter apps


Facing any issues while trying to install iPadOS beta on your iPad? Drop a comment and we will help you out!

How to Enable Spatial Sound in Windows 11

  How to Enable Spatial Sound in Windows 11 Here's how to enable  Spatial Sound  in Windows 11: Open Settings by pressing Windows key + ...