Thursday, February 28, 2019

How to Fix YouTube Error 400 on iDevices/Computers

How to Fix YouTube Error 400 on iDevices/Computers

The YouTube Error 400 is not actually connected to YouTube nor is the problem emanating from faulty YouTube app on your iPhone, computer or Apple TV, but it related to HTTP protocol.

Therefore, in the following parts of this post, we shall be throwing more lights on what YouTube 400 error is, how to fix it, best website to download YouTube videos and the best way to upload YouTube videos from computer to iPhone.


Part 1: What is YouTube Error 400 and Why Does It Occur?


Part 2: How to Fix YouTube Error 400


Part 3: How to Download YouTube Video to Computer for Free


Part 4: How to Transfer Computer Video to iPhone
What is YouTube Error 400 and Why Does It Occur?

The YouTube error 400 just like every other 400 Bad Request Error is an HTTP status code, which shows that the request you sent to YouTube server to load a webpage or play a video is somehow incorrect or corrupted, and the server couldn’t understand it.
How to Fix YouTube Error 400

Most YouTube error 400 occurs on iPhone Safari or computer browsers when you enter the wrong URL in the address windows, but there are other common causes such as corrupt website cookies, caches, and files on your system. Hence, the solution to YouTube error 400 lies in fixing these common causes.
1st Solution: Check YouTube URL

We earlier mentioned that YouTube 400 error usually occurs when you enter an incorrect request. By incorrect request, we mean typing a wrong URL on your browser, which would make the HTTP status code to return an error 400 (Page Not Found).

So, we’re asking you now to go back to your browser search bar and check if the URL you inputted is correct or wrong. If you’re certain that the URL is correct, then you can go to our second solution.
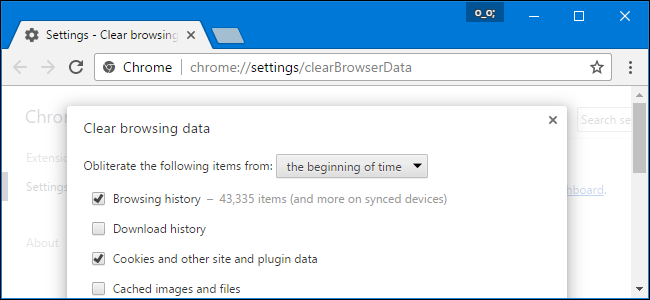
2nd Solution: Delete Browser Cookies

90% of users who have deleted their browser cookies reported that it fixed the YouTube 400 error chrome. Here is how to delete cookies in your Google Chrome browser:

Step 1: Launch your Google Chrome and click on the Menu tab (i.e. the 3 dotted vertical line on the left side of your browser).

Step 2: Click the Settings tab and “Settings Menu” tab (i.e. 3 vertical lines on the top left side of your window). Then click “Advanced” and scroll through the drop-down menu to “Privacy and Security” to click it.

Step 3: Click “Clear Browsing Data” and unmark every item except “Cookies and other site data”. You can set the time range if you want to.

Step 4: Click “Clear Data” tab to delete all your Google Chrome cookies and other site data.


3rd Solution: Clear Browser Caches

Browser caches can also be the culprit we are looking for if deleting browser cookies doesn’t fix Google error 400 YouTube. Here is how to clear browser caches on Google Chrome browser:

Step 1: Launch your Google Chrome and click on the Menu tab (i.e. the 3 dotted vertical line on the left side of your browser). Then click the Settings tab.

Step 2: Click the Settings tab and “Settings Menu” tab (i.e. 3 vertical lines on the top left side of your window). Then click “Advanced” and scroll through the drop-down menu to “Privacy and Security” to click it.

Step 3: Click “Clear Browsing Data” and unmark every item except “Cached images and files”. You can set the time range if you want to.

Step 4: Click “Clear Data” tab to delete all your Google Chrome cached images and files.


How to Download YouTube Video to Computer for Free

Have you thought of downloading YouTube videos and playing them offline? The YouTube error 400 only occurs when you want to stream a YouTube video online. So, to avoid all YouTube errors and enjoy your videos on your favorite devices, you’ll need to download YouTube videos from a website and play them offline on your device.
#1. Some Recommended Website to Download YouTube Video

Here are some recommended websites to download YouTube Videos:


iTubeStudio


FLVto.com


ClipConverter.com


Share-Tube.eu


SaveVid.com


Savefrom.net


FetchVideos.com


VideoGrabber.net, etc.


#2: The Steps to Download YouTube Video on Computer

We shall be using the first website on our list (iTube Studio), to explain steps to download YouTube videos on the computer.

Step 1: Download and install this YouTube Video downloader on your Mac or Windows PC. Run the app, and click the Download tab on the main interface.

Step 2: Go back to your Google Chrome browser and copy the YouTube video’s URL. Come back to iTube Studio and click “Paste URL” tab. Click OK and wait for few seconds for the download to start.

Sponsor ads:

Gihosoft Free iPhone Data Recovery:https://www.gihosoft.com/iphone-data-recovery-free.html

Gihosoft iPhone Data Recovery Free

Free iPhone Data Recovery Software for Windows/Mac

Recover up to 12+ types of files, including contacts, SMS, photos, WhatsApp, Viber, notes, etc.

Restore lost data from iOS devices directly or from iTunes and iCloud backup

Recover iPhone data lost due to iOS upgrade/jailbreak, accidental deletion, device lost or broken

Support all the latest iPhone, iPad and iPod Touch

Both Free and Pro version.

If you lost data after you updated to a new iPhone, you can always use Gihosoft iPhone Data Recovery to get the data back from the old iPhone or backup.You may also like: iphonerecovery.com

If you use android phones, please choose Gihosoft Android Data Recovery.

With Gihosoft Android Data Recovery, no longer afraid of data loss!

Must read:Youtube video downloader for pc

Gihosoft RePicvid Free Photo Recovery Software provides a free photo recovery software for windows to help users recover the deleted or lost photo for free.

Jihosoft Android Data Recovery: the best Android Data Recovery software for Windows and Mac to recover deleted contacts, messages, photos, videos, WhatsApp and etc from Android devices.Tips:How to transfer messages from iPhone to iPhone


jihosoft Free iPhone Data Recovery

Wednesday, February 27, 2019

How to Remove iPhone from iCloud on the Device

1  How to Remove iPhone from iCloud on the Device - 2 Ways

Way 1: Turn off Find My iPhone

Take the following steps to remove your iPhone from iCloud on the device:
  • On the iPhone, go to Settings > [Your Name] > iCloud and turn off Find My iPhone.
Find My iPhone
Your iPhone will be removed from the device list from Find My iPhone. But it won’t influence the data on the device.

Way 2: Erase All Contents and Settings

You can also make sure to delete the data on your device by going to Settings > General > Reset > Erase All Content and Settings. When you erase your data, this turns off Find My Phone and Activation Lock.
Erase All Contents and Settings
Not only your iPhone will be removed from iCloud, but also all the data will be deleted from iPhone.

3 How to Remove iPhone from iCloud on Other iPhone

Take the following steps to remove a device from iCloud by using another device:
  1. Sign in to iCloud with the same Apple ID on the new device.
  2. Go to “Settings > iCloud > Your Account > Devices".
  3. Tap the device you want to erase in the Devices list.
  4. Choose “Remove from Account” and confirm it.
Remove iPhone from iCloud
However, this won’t delete the device from the associated devices list permanently. If the device is signed in with the same Apple ID and connects to the internet. This device will reappear in the devices list.Sponsor ads:Top 7 Best Superhero wallpaper Apps for Android 2019

4 How to Remove iPhone from iCloud via iCloud.com

So, you might also not have access to your phone or any other phone at the time. If you have your computer, you can still remove your phone from iCloud through iCloud.com. Just take the following steps:
  1. Go to iCloud.com and login with your details.
  2. In the next screen, click on the “Find iPhone” feature.
  3. This takes you to another screen. At the top, click on the “All Devices” drop down menu. You’ll see a list of devices connected to your iCloud account.
  4. Click on the one you want to remove and click Erase iPhone. Confirm by click on "Erase".Sponsor ads:Share YouTube Video at Specific Time from App and Browser
Remove iPhone from iCloud
If the device is currently offline, the erase begins when it comes online. Also, when you erase it, all the credits and debit cards associated with your Apple Pay get deleted. It also disables Apple Pay even if the device is offline.Sponsor ads:
Gihosoft iPhone Data Recovery Free
Free iPhone Data Recovery Software for Windows/Mac
Recover up to 12+ types of files, including contacts, SMS, photos, WhatsApp, Viber, notes, etc.
Restore lost data from iOS devices directly or from iTunes and iCloud backup
Recover iPhone data lost due to iOS upgrade/jailbreak, accidental deletion, device lost or broken
Support all the latest iPhone, iPad and iPod Touch
Both Free and Pro version.
If you lost data after you updated to a new iPhone, you can always use Gihosoft iPhone Data Recovery to get the data back from the old iPhone or backup.You may also like: iphonerecovery.com
If you use android phones, please choose Gihosoft Android Data Recovery.
With Gihosoft Android Data Recovery, no longer afraid of data loss!
Gihosoft RePicvid Free Photo Recovery Software provides a free photo recovery software for windows to help users recover the deleted or lost photo for free.
Jihosoft Android Data Recovery: the best Android Data Recovery software for Windows and Mac to recover deleted contacts, messages, photos, videos, WhatsApp and etc from Android devices.Tips:How to transfer messages from iPhone to iPhone

Monday, February 25, 2019

How to Reset iTunes Password 2019


How to Reset iTunes Password

If you’ve tried every other possible means required to recover your password, and it still doesn’t work, then it’s time for you reset it, following these simple steps.

Step 1. When you log on to the iTunes Store, click on the “Forgot Apple ID or Password” bar

Step 2. Input your Apple ID in the space provided, and then click Next

Step 3. After you’ve entered your ID, you’ll have to choose between; Email Authentication or Answering security questions

Step 4. If you choose the first option, then you’ll receive a mail urging you to follow the link to reset your password. But if you choose the second option, make sure that you remember your answers to the security question you set while creating the account.

Step 5. And once you’ve acquired a new password; log in to iTunes to ensure that it works.


Sponsor ads:Create a Second Instagram and Manage Multiple Accounts

Sunday, February 24, 2019

How Do I Restore My iPhone 6 2019 Guide


How to Restore iPhone 6 from iTunes Backup?

The first method here we are introducing to restore your iPhone 6 is to restore it from an iTunes backup. By following the steps below you can successfully get through this process.


Open iTunes software on the Mac or PC that you used to back up your device. Make sure that you are using the latest version of iTunes.


Connect your device to your computer with a USB cable. You will see the message on.


your iDevice here tap Trust this device.


Select your iPhone, iPad, or iPod touch when it appears in iTunes.


Select the backup you need to in iTunes from the list of backups.


Click Restore and wait for the restore time to finish. If asked, enter the password for your encrypted backup.


Keep your device connected after it restarts and waits for it to synchronize with your computer.


Once the sync process completes now your iPhone 6 is ready to use.
How to Do iPhone 6 Restore from iCloud Backup

You can also choose to restore your iPhone 6 by utilizing the iCloud backup. In order to do so follow the steps, we have mentioned below.


Turn on your device. You should see a Hello screen. If you already set up your device, you need to erase all of its content before you can use these steps to restore from your backup.


Follow the onscreen setup steps until you reach the Apps & Data screen, and then tap Restore from iCloud Backup.


Sign in to iCloud with your Apple ID.


To pick the most relevant backup to see the date and size of the backup. After you choose, the transfer starts.


Now here wait for a progress bar to appear and complete. During this whole process, ensure the stable internet connection.


Now you can finish setup and enjoy your device. Content like your apps, photos, music, and other information will continue to restore in the background.


Restore iPhone 6 from iTunes/iCloud Backup Selectvely

You can use iCloud or iTunes to transfer your entire mobile system from your old iPhone to your iPhone 6. It's a clumsy, one-way process, though, and can be time-consuming. For this reason, here we are introducing a third party manager tool that can be a good replacement of iTunes or iCloud to finish iPhone 6 restoring. We are talking about, iMyFone iTransor.Bonus Tips:
Restoring Lost Photos and Videos from iPhone

If you have deleted some of your pictures or videos from your gallery, then there is a straightforward way to Recover Deleted Files iPhone back.

After you delete the media files from your gallery, be it photos or videos, then you must know that iOS has a feature that the deleted media files doesn’t get deleted immediately, but it gets compiled to a temporary folder from where it gets deleted after 30 days. If you lost data after you updated to a new iPhone, you can always use Gihosoft iPhone Data Recovery to get the data back from the old iPhone or backup. Should you wish to recover these files, you must go to that “recently deleted” folder and retrieve these files before 30 days.

If you use android phones, please choose Gihosoft Android Data Recovery.

Worth reading:Best youtube downloader online download youtube 1080p

Must Read:

How to transfer messages from iPhone to iPhone

Must read:icloud activation lock removal

Must read:Gihosoft Free iPhone Data Recovery:https://www.gihosoft.com/iphone-data-recovery-free.html

Thursday, February 21, 2019

How to Resolve iPhone Speaker Problem 2019

Many of the iPhone users have complaints about the iPhone speaker problem. You call someone and are not capable of listening anything from the other side on the phone. You may feel dissatisfied at this instant and plan to walk towards nearest repair store to get the problem fixed by the professionals. But hang on! Don’t jump to the conclusion that your iPhone may be having some hardware malfunction. Sometimes it seems not true. The speaker issue can be a result of software malfunction as well. Therefore, with no more stress, read on and find some simple tips for iPhone’s no sound problem.

Tip 1. Check Sound Settings

1. Ring/Silent Switch Check

Sometimes you may have unknowingly turned the Ring/Silent Switch on the exterior of your iPhone to silent mode. If you see an orange near that switch, your iPhone is definitely set on silent mode. Make sure you have turned it to Ringer Mode by pulling it to the front side of your iPhone.
mute switch check

2. Volume Check

Other possible reason could be that the volume may have been lowered and you forgot to raise it back again. Adjust the volume with volume buttons. If this doesn’t work, head to “Settings”, proceed to “Sounds”. Now, to turn up the volume, you have to drag the Ringer and Alerts slider.

Tip 2. Force Reboot Check

Try to restart your iPhone. A temporary or minor glitch could have been troubling you. Restarting your device will get this glitch eliminated. You need to hold the “power button” and “home button” for no more than 10 seconds.
Force Reboot

Tip 3. Bluetooth Check

There could be a possibility that your iPhone is connected to a Bluetooth and playing sound through that. Turn off the Bluetooth from the Settings and check again for the sound.
turn off bluetooth

Tip 4. Connect Headset to Check

Test the sound of your iPhone with a headset. Plug in your headset into your iPhone and check if through the headset, you can hear the sound or not. Sometimes due to the presence of the dust, dirt or grime, the connectors may work badly and your iPhone may think the headset is still pluged in. This situation is iPhone gets stuck in headphone mode so that you can not hear the sound without headset. Hence, you need to clear out dirt, grime or dust from the headset port to resolve the issue.If you lost data after you updated to a new iPhone, you can always use Gihosoft iPhone Data Recovery to get the data back from the old iPhone or backup.You may also like: iphonerecovery.com
clean headset port
Take a brush and clean the docking area where you plug in your headset. Remember to do this gently! You can also use alcohol or methylated spirits or acetone as they will aid in removing off extra dirt and on a plus, these chemicals get evaporated and will, in turn, not do any harm to the connectors.

Tip 5. Solve iPhone Speaker Problem Using Third-party Tool

Sometimes, iPhone no sound problem can also be caused by system issue. You can settle this issue without losing your data. This can be done with the help of iMyFone iOS System Recovery, a remarkable software that empowers you to repair your iOS device.Sponsor ads:
Gihosoft iPhone Data Recovery Free
Free iPhone Data Recovery Software for Windows/Mac
Recover up to 12+ types of files, including contacts, SMS, photos, WhatsApp, Viber, notes, etc.
Restore lost data from iOS devices directly or from iTunes and iCloud backup
Recover iPhone data lost due to iOS upgrade/jailbreak, accidental deletion, device lost or broken
Support all the latest iPhone, iPad and iPod Touch
Both Free and Pro version.
If you lost data after you updated to a new iPhone, you can always use Gihosoft iPhone Data Recovery to get the data back from the old iPhone or backup.You may also like: iphonerecovery.com
If you use android phones, please choose Gihosoft Android Data Recovery.
With Gihosoft Android Data Recovery, no longer afraid of data loss!
Gihosoft RePicvid Free Photo Recovery Software provides a free photo recovery software for windows to help users recover the deleted or lost photo for free.
Jihosoft Android Data Recovery: the best Android Data Recovery software for Windows and Mac to recover deleted contacts, messages, photos, videos, WhatsApp and etc from Android devices.Tips:How to transfer messages from iPhone to iPhone

How to Enable Spatial Sound in Windows 11

  How to Enable Spatial Sound in Windows 11 Here's how to enable  Spatial Sound  in Windows 11: Open Settings by pressing Windows key + ...